The Idea
My fuel to create comes from finding ways to merge the worlds of technology and creativity . My specialty lies in developing interactive 3D experiences with Three.js, and I strongly believe in open-source philosophy and knowledge sharing. This is why I always try to rely on free, community-driven tools and libraries such as Three.js , Blender as a 3D editor, Audacity for audio editing, and VS Code for coding.
Two long-standing creative desires I had were storytelling and music composition . In this project, I aimed to heal those "creative itches" by telling a short two-minute story and composing an ambient soundtrack to accompany the journey.
The initial spark came when I revisited the hand-painted animated content of Theater Elsewhere using Meta Quest headsets. These immersive worlds were created with Quill.art , a VR illustration and animation tool developed by Íñigo Quílez. This led me to think: I need to find a workflow that allows me to tell immersive stories , and the tools I felt most comfortable with were Blender and Three.js.
Web technology also offers a huge advantage: lightness . With just over 5 MB , you can deliver a two-minute film that runs seamlessly across multiple platforms using the exact same codebase.
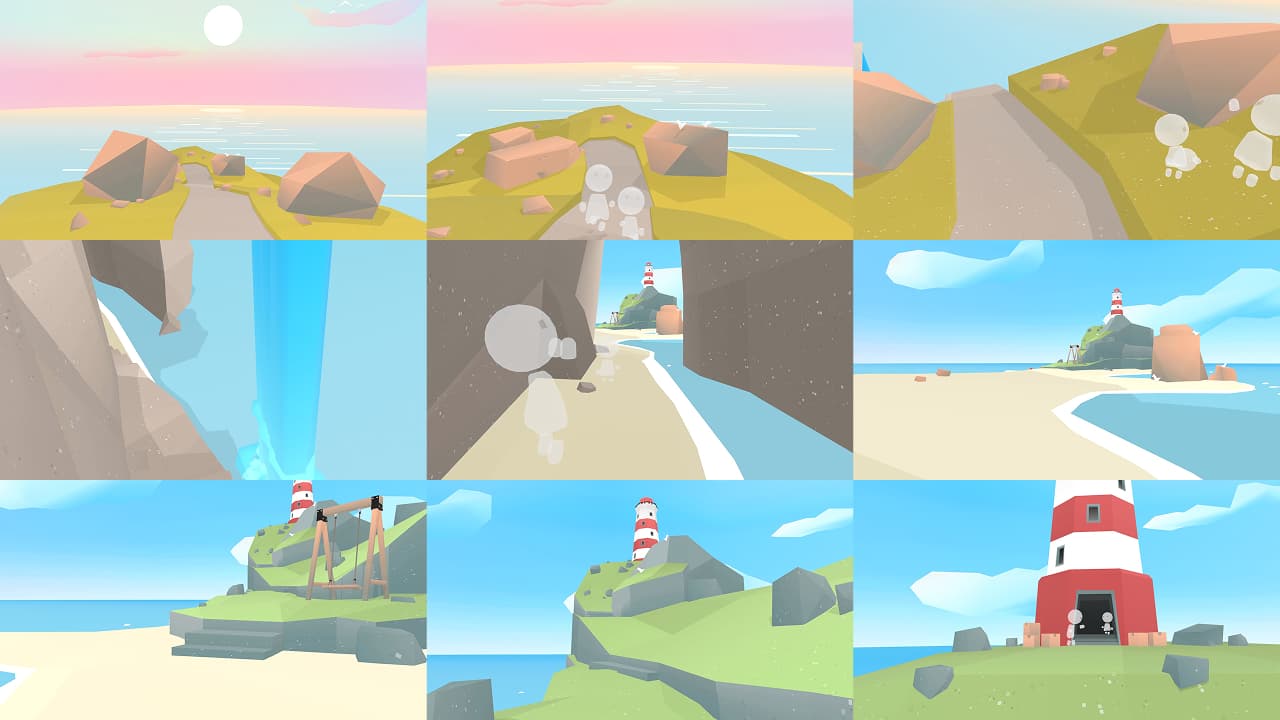
Scene captures
Inspired by animated films created in Quill.art like "Tales from Soda Island" , VR games developed with Unity like "Lands End" , and even older web experiments merging music and visuals like "Rome" , I started working on this project.
The core idea was to create a single-take journey across an abandoned island, where "memories" appear along the way. By combining positional audio and a first-person continuous view , I sought to immerse the viewer deeply into this nostalgic and dreamlike story.
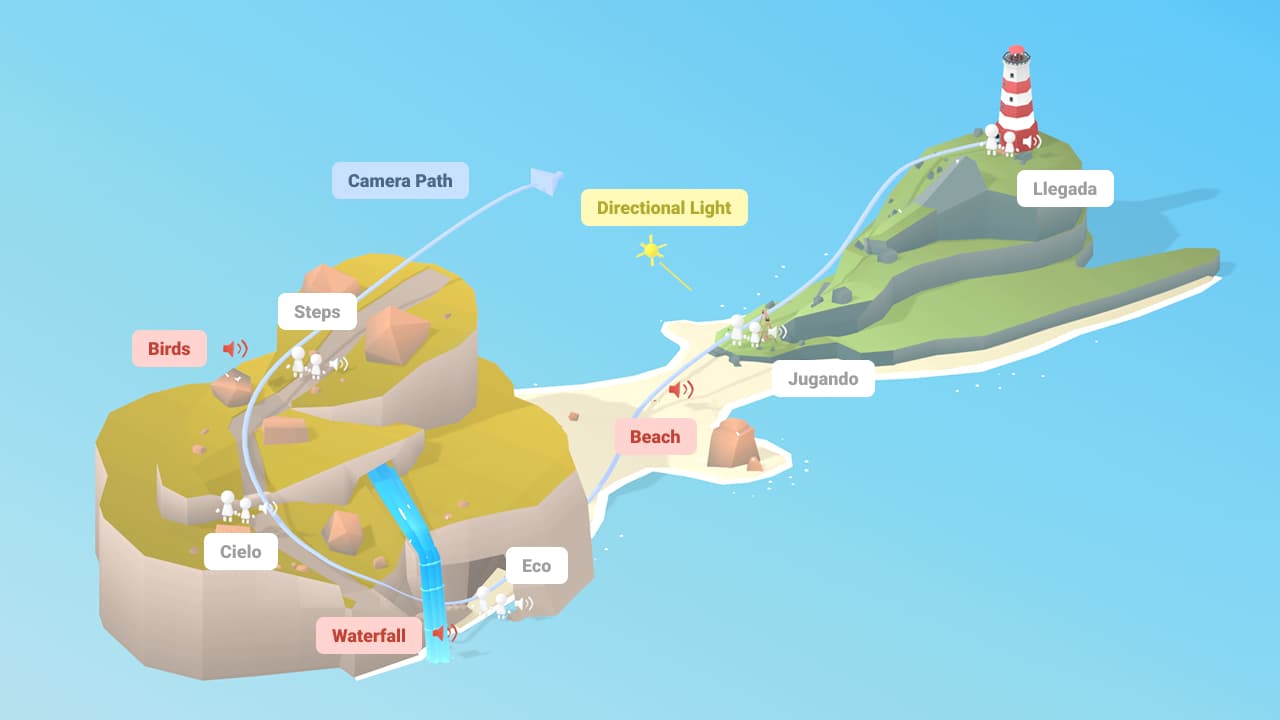
Scene blueprint with all important elements.
Technical challenges
1. Matching Blender EEVEE rendering with Three.js
One of my main goals was to ensure that the design and development processes worked seamlessly together. I wanted every single frame of the immersive film to look "beautiful" , as if it were a carefully composed painting. Framing shots directly in Blender and knowing they would render identically in Three.js was essential to achieve this.
Two key factors made this possible: correctly exporting the lighting setup and the camera path , which will be detailed in the next section.
Global illumination is not directly exported, so it’s necessary to
create a corresponding
THREE.AmbientLight
in Three.js that matches Blender’s World Properties settings. The
Sun Light in Blender is exported as a
THREE.DirectionalLight
, which only needs to be configured to cast shadows correctly
after importing the GLB file. One important detail: when exporting
from Blender, you must set the Lighting Mode to
"Unitless"
to avoid unexpected lighting artifacts.
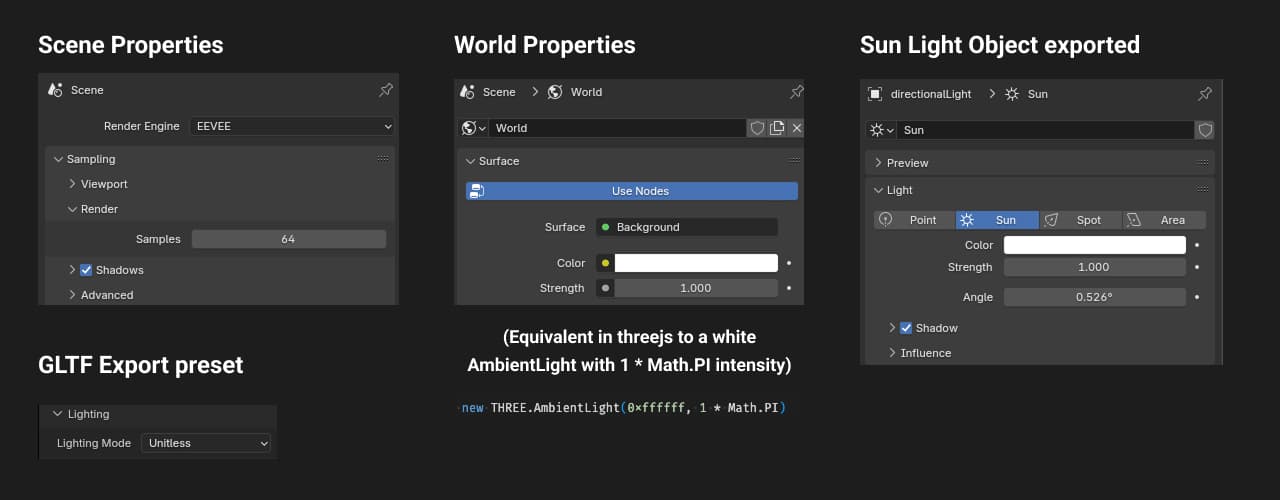
Lighting settings snippets from Blender UI
2. Designing a continuous camera path for a single take
The key to achieving a smooth, continuous camera movement was to place the camera inside an Empty object in Blender, referred to as the CameraRig , and link it to a bezier curve.
First, we create a bezier curve and enable Path Animation , specifying the total number of frames needed for the camera to travel along it. In our case, this was set to 2,808 frames (equivalent to a 117-second single take).
Next, we add a Follow Path constraint to the CameraRig, targeting the bezier curve. This setup ensures that the CameraRig follows the defined path throughout the entire timeline.
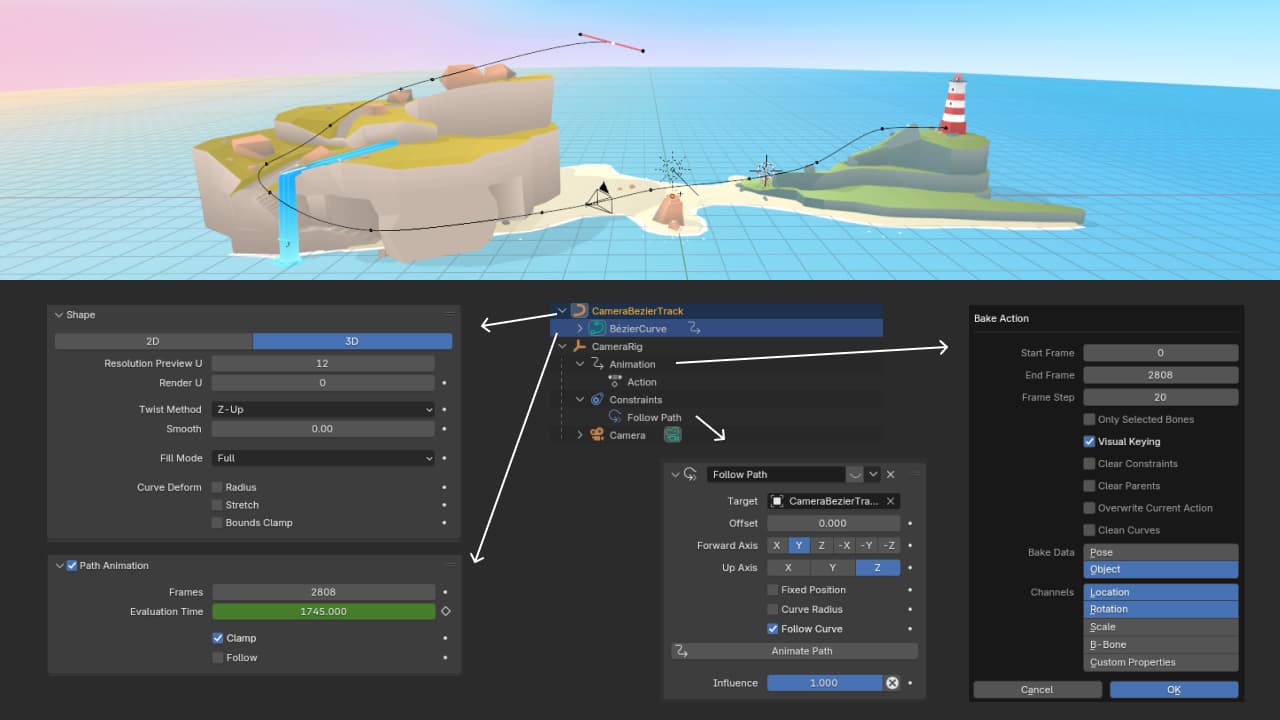
Blender UI showing curve and constraint settings
To export this animation properly in the GLB file, we need to bake
it. This is done by selecting the CameraRig and navigating to:
Object > Animation > Bake Action
. In our project, we used a step of every
20 frames
, which was sufficient to maintain smoothness. Depending on each
project's needs, this value can be adjusted for more or less
detail.
3. Materials and shading consistency
In this project, we used as few materials as possible to optimize performance. We also avoided embedding images in the GLB file, as they were dynamically preloaded on the Three.js side instead.
A key part of the workflow was creating a
SceneLoader
class, where we defined a
setupMaterials
method. In this method, we created two
THREE.MeshStandardMaterial
and one
THREE.MeshBasicMaterial. Then, during the
setupScene
phase (executed after loading), we used a
traverse
function to assign these materials to any node that was a
Mesh.
3a. Gradient material
In Blender, this was a
Principled BSDF
material connected to an
Image Texture node set as the
Base Color. The texture itself was a minimal
128x128px
image, using
16x64px
gradient bands. By using
gradient mapping
with an atlas texture, we achieved a colorful scene using a
very small texture, which is
especially effective for an
"unlit"
aesthetic.
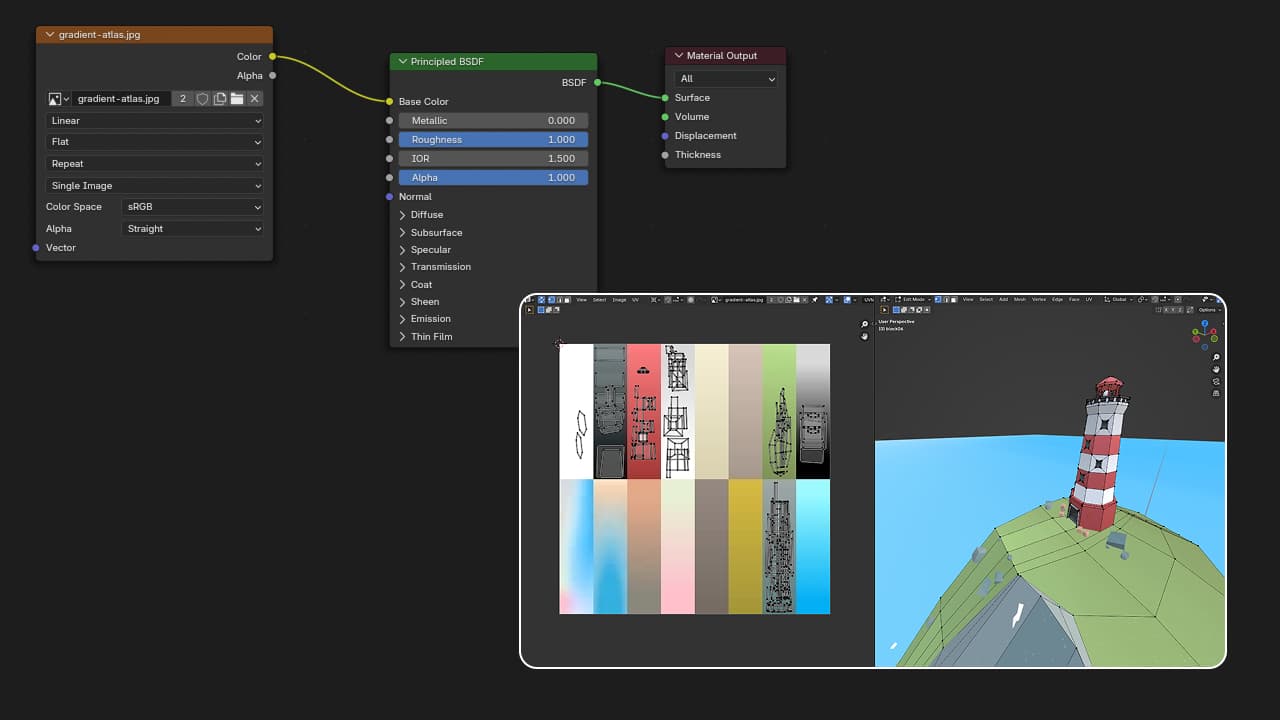
Gradient material setup in Blender.
3b. Gradient with pattern material
This one was more
complex. I
wanted to recreate an aesthetic similar to the rocks in
Lands End, which used a color
gradient combined with a pattern texture. To achieve this, we
needed
two sets of UVs. The first UV set was used similarly to the gradient material
(referenced in Blender as the default
UVMap), and
we created a second UV set (UVMap.001) scaled by a factor of 16 using a
Vector > Mapping node. Then, we
mixed both before connecting them to the Base Color. This entire
node setup is shown in the image.
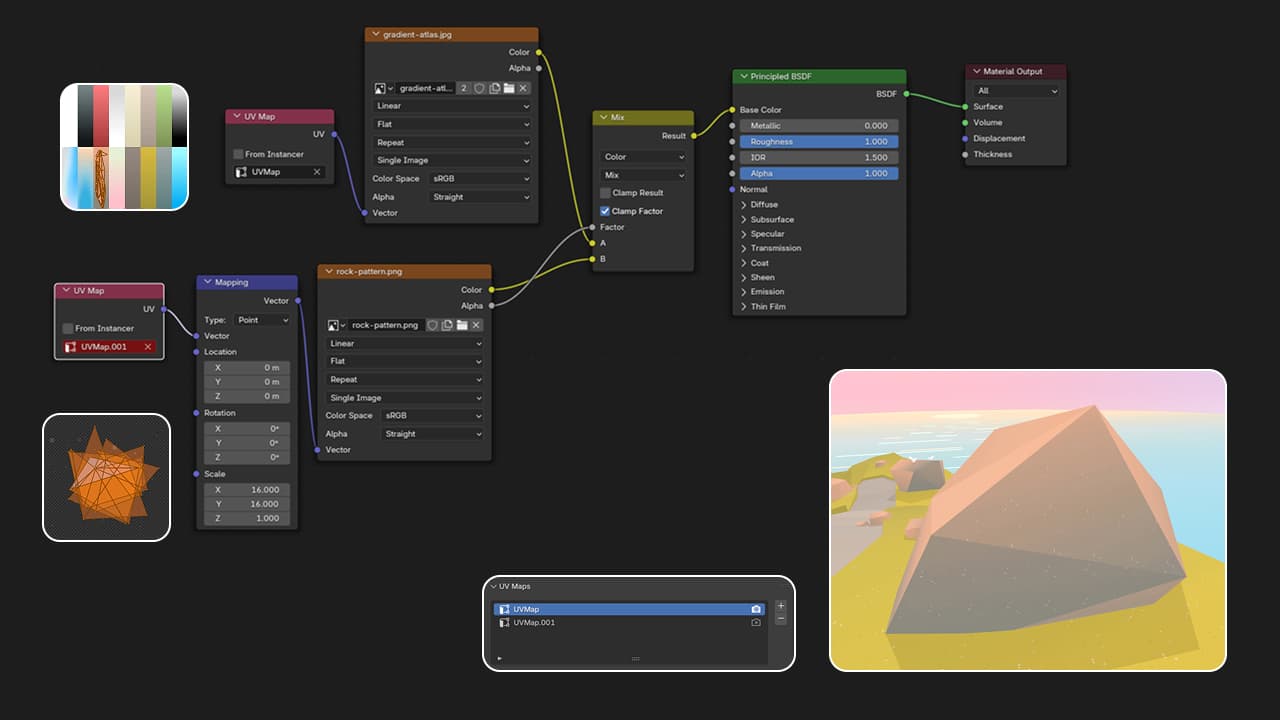
Gradient and pattern material node setup in Blender.
While this looked as intended in Blender, matching it in Three.js
required
further work. Starting from a clone of the gradient material, I used the
onBeforeCompile
method to inject an additional map and assign it to the secondary
UV channel (.uv1
in Three.js, as the primary is
.uv). The
code snippet below shows how this was implemented:
    this.commonGradientPatternMaterial = this.commonGradientMaterial.clone()
    this.commonGradientPatternMaterial.onBeforeCompile = (shader) => {
        shader.uniforms.map2 = { value: assets.pattern_img }
        shader.uniforms.repeatScale = { value: 8.0 }
        shader.vertexShader = shader.vertexShader.replace(
            '#include <uv_pars_vertex>',
            `
                #include <uv_pars_vertex>
                attribute vec2 uv1;
                varying vec2 vUv1;
                `
        )
        shader.vertexShader = shader.vertexShader.replace(
            '#include <uv_vertex>',
            `
                #include <uv_vertex>
                vUv1 = uv1;
                `
        )
        shader.fragmentShader = shader.fragmentShader.replace(
            '#include <uv_pars_fragment>',
            `
                #include <uv_pars_fragment>
                varying vec2 vUv1;
                uniform sampler2D map2;
                uniform float repeatScale;
                `
        )
        shader.fragmentShader = shader.fragmentShader.replace(
            '#include <map_fragment>',
            `
                #ifdef USE_MAP
                vec4 sampledDiffuseColor = texture2D( map, vMapUv );
                vec4 patternColor = texture2D( map2, vUv1 * repeatScale );
                diffuseColor *= mix(sampledDiffuseColor, patternColor, patternColor.a);
                #endif
                `
        )
    }
3c. Memories material
This was the simplest material by itself: a
THREE.MeshBasicMaterial
with
transparency. However, the complexity came from the need to
animate its opacity over time,
so the "memories" could appear and disappear throughout the film.
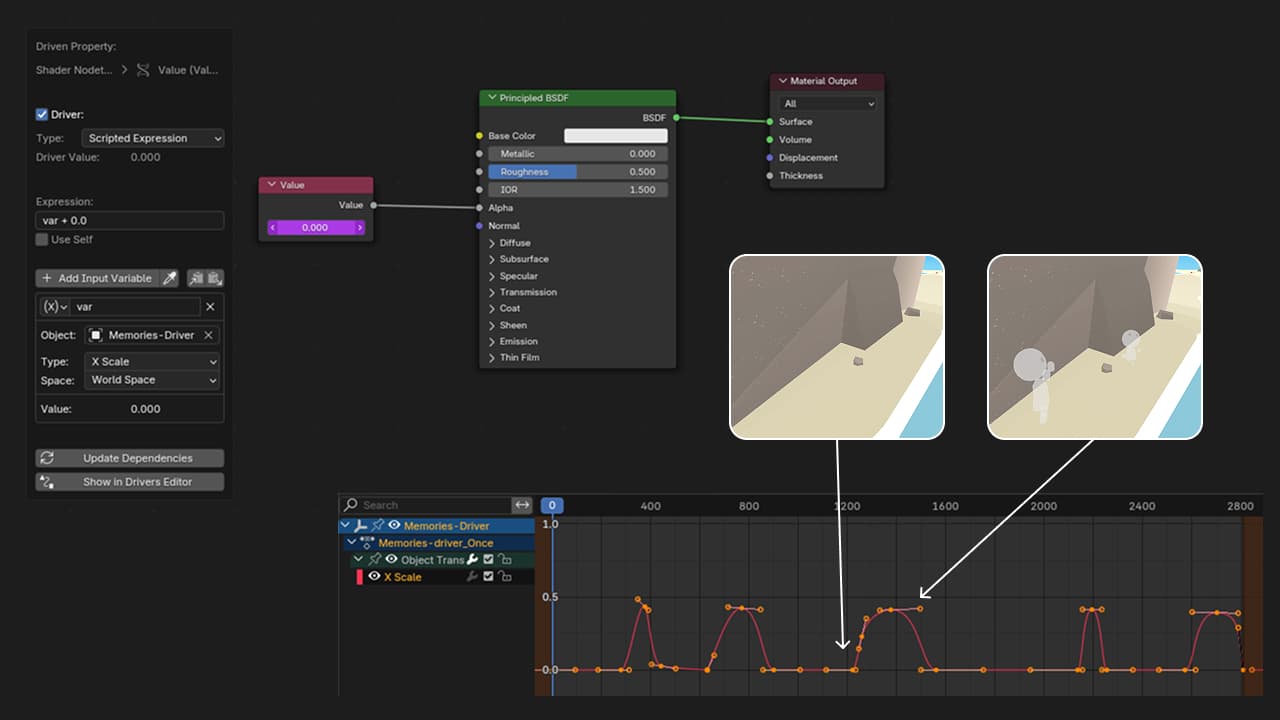
Memories material node setup in Blender.
In Blender, I needed a value that could be
animated over the timeline. I chose the
scaleX
property of an Empty object named
"Memories-Driver", which I
animated in the Graph Editor to control when each memory should
appear or fade. To link this to the material's alpha, I added an
Input > Value
node, then connected a
driver to
it. This driver referenced the scaleX value of "Memories-Driver."
On the Three.js side, during the
update loop, I assigned the
opacity
property of the material to the
scale.x of
the exported Memories-Driver
object3D,
ensuring perfect sync with the timeline.
4. Animation System & Techniques
In this project, we used three main types of animations:
Transform,
Shape Keys
(Morph), and
Skeletal animations. Each animation could also have a different looping type:
Once,
Loop, or
PingPong. To make this easier
to manage, we named each animation in Blender with a suffix that
indicated its loop type. This allowed us to correctly map each one
to a
LoopType in
their corresponding
THREE.AnimationAction.
    clips.forEach((clip) => {
        const isOnceClip = clip.name.includes('Once')
        this.animationActions[clip.name] = isOnceClip
            ? this.animationCameraMixer.clipAction(clip)
            : this.animationMixer.clipAction(clip)

        let loopType = THREE.LoopOnce
        let clampWhenFinished = true
        if (clip.name.includes('Loop')) {
            loopType = THREE.LoopRepeat
            clampWhenFinished = false
        } else if (clip.name.includes('PingPong')) {
            loopType = THREE.LoopPingPong
            clampWhenFinished = false
        }
        this.animationActions[clip.name].setLoop(loopType)
        this.animationActions[clip.name].clampWhenFinished = clampWhenFinished
        this.animationActions[clip.name].play()
    })
There was also an important structural decision: we used
two separate
THREE.AnimationMixer
instances. The first one, called
animationCameraMixer, was dedicated to animations that ran
once and could be paused
(mainly the camera and story-driven sequences). The second mixer,
simply named
animationMixer, was used for all other continuous or looping animations.
This dual-mixer approach gave us granular control over timing and playback, making it possible to sync story beats while keeping background or ambient animations running smoothly.
4a. Transform & Shape Key Animations
Here we can see different
Transform
and
Shape Key
animations, each with its own duration and purpose. All these
animations were renamed with
descriptive suffixes
so they could be properly handled by the custom
AnimationController
class we created in the project.
Dope Sheet Blender view with transform and shape key animations
4b. Skeletal Animations
For skeletal animations, the main priority was to create humanoid
figures using the
smallest number of bones possible, since this type of animation generates the
heaviest data when exported. In
this case, we designed a humanoid with just
12 bones.
Another benefit of using a workflow where the render matches what will be seen in real time on the web is that we can animate frame by frame and immediately preview exactly how it will look in the final camera framing.
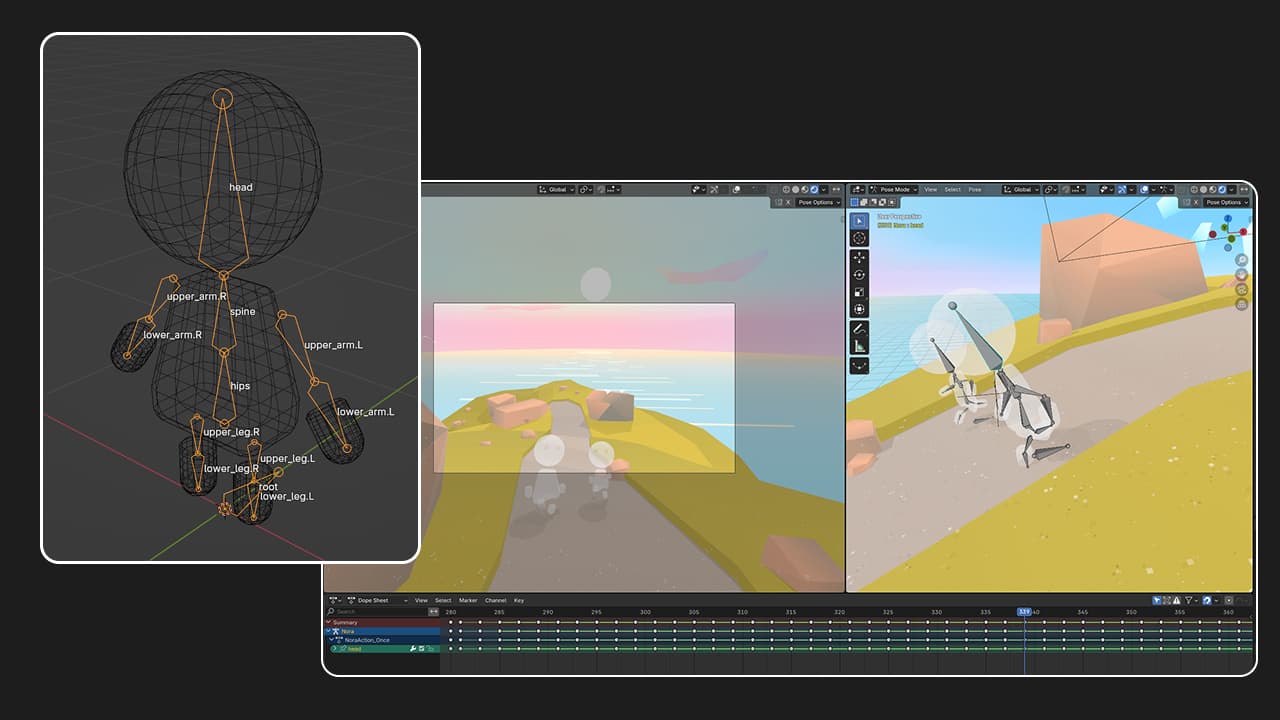
Skeletal animations
Sound design
The project features three distinct audio layers. The first layer
includes three
positional audios
— birds, waterfall, and beach — which are synchronized with the
timeline of
loop or ping-pong animations. The
other two layers are tied to the
animationCameraMixer
and run once: these are the
"memories"
audio fragments and the
ambient track.
Ambient soundtrack composition
Sound design is something I had always
outsourced in the past. However,
last winter I began studying
music theory,
and my intention for 2025 was to dive deeper into this area. In
fact, for my birthday, my family gifted me an
external pad that came with a
license for
Ableton Live 12 Lite
to help me learn music composition. This gift sparked my motivation
to create a humble
ambient track,
using the
ableton-MCP
tool as AI assistance.
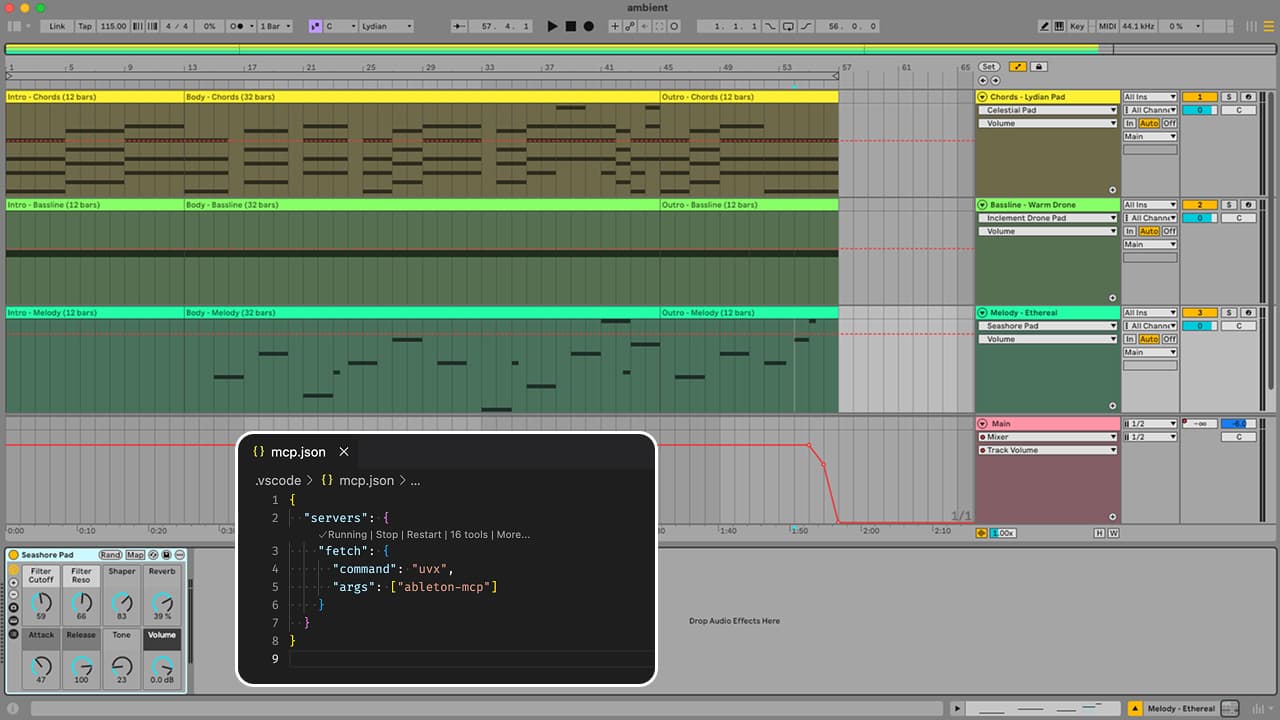
Ableton Live 12 Lite session with the ambient track and a snapshot of the ableton-MCP running in the background.
The piece blends a
melody,
chords, and
bassline,
structured in three parts: a
12-beat intro,
a
32-beat body,
and a
12-beat outro,
giving the track a
clear contour and an
evolving, immersive shape.
Final adjustments and positional mix
After composing the ambient base, further adjustments were made in
Audacity. The
ambient.mp3
track was smoothed and its volume
was
dynamically reduced
when overlapping with the positional memory sounds, to avoid masking
and enhance spatial clarity. The
final positional elements were then exported as a single
positional.mp3.
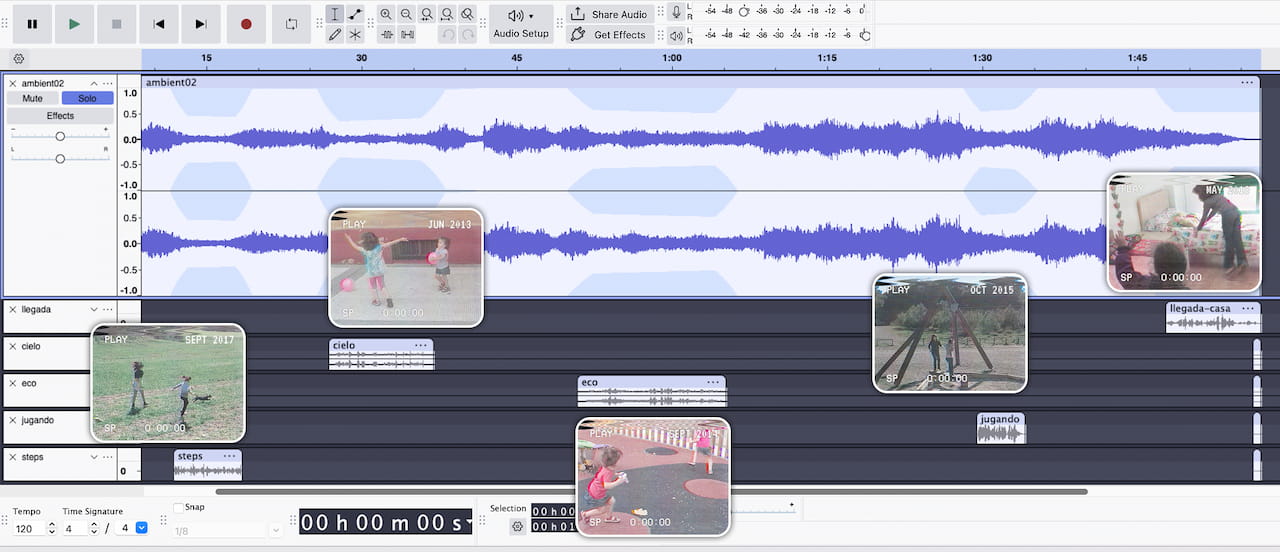
Audacity session with sound layers and video snapshots from the original audio sources.
Project details
Open Source
All source code, including the original .blend (Blender 3D) and
.als (Ableton Live) files, are publicly available in the GitHub
repository.
This section summarizes the technical details behind the project, showcasing how the use of modern web technologies enables a lightweight (~5 MB) , single-codebase implementation that runs smoothly across desktops , tablets , mobile devices , and even VR headsets , all with one unified development .
The scene uses between 20–40 draw calls , which could be further reduced by merging meshes in Blender. However, they were intentionally kept separate to preserve flexibility and simplify the design process.
Supported platforms
- Windows
- macOS
- Linux
- iOS
- Android
- WebXR compatible devices
Asset Sizes (Total ~5 MB)
Core assets (~335 KB)
Audios (~3.3 MB)
3D Scene (~2.07 MB)
GLB 3D model info
- Ping Pong 20
- Loop 10
- Once 8
- Directional Light 1
- Skinned Meshes 2
- Object3D 8
- Meshes 52
Credits
ENJOY Into the lighthouse Immersive Film now!