
This post is an extension of the Why you should start to creating 3D content for the web article, here I’m gonna explain and share all the files that I made to create this Futuristic Chest PBR 3D model.
The goal
To have a 3D model compatible with the web
In this case we’ll obtain a 3D model optimized to be used with AR. But we could need another features then we can choose other alternatives as are explained here.
Our final final will be a glTF file that is compatible with any browser that support WebGL and can be used with AR on Android devices, and at the end of the post we learn to convert to USDZ to make it work as an AR asset on iOS based devices.
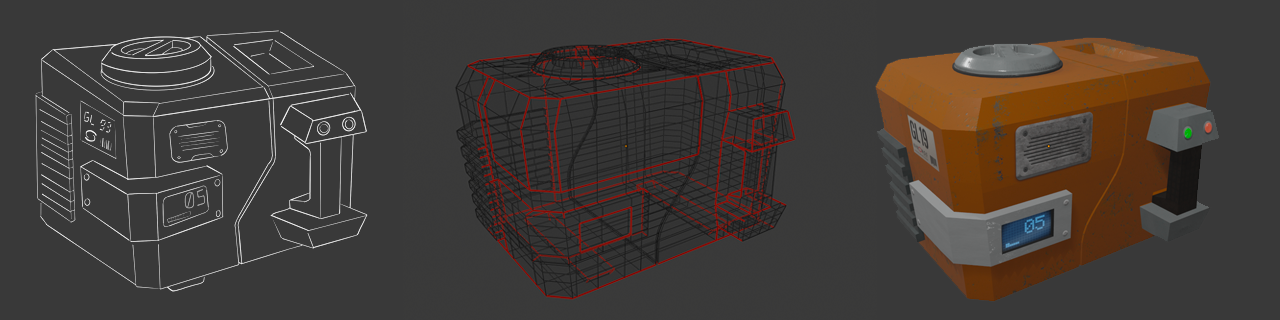
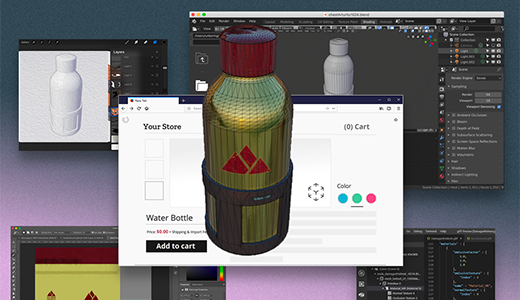
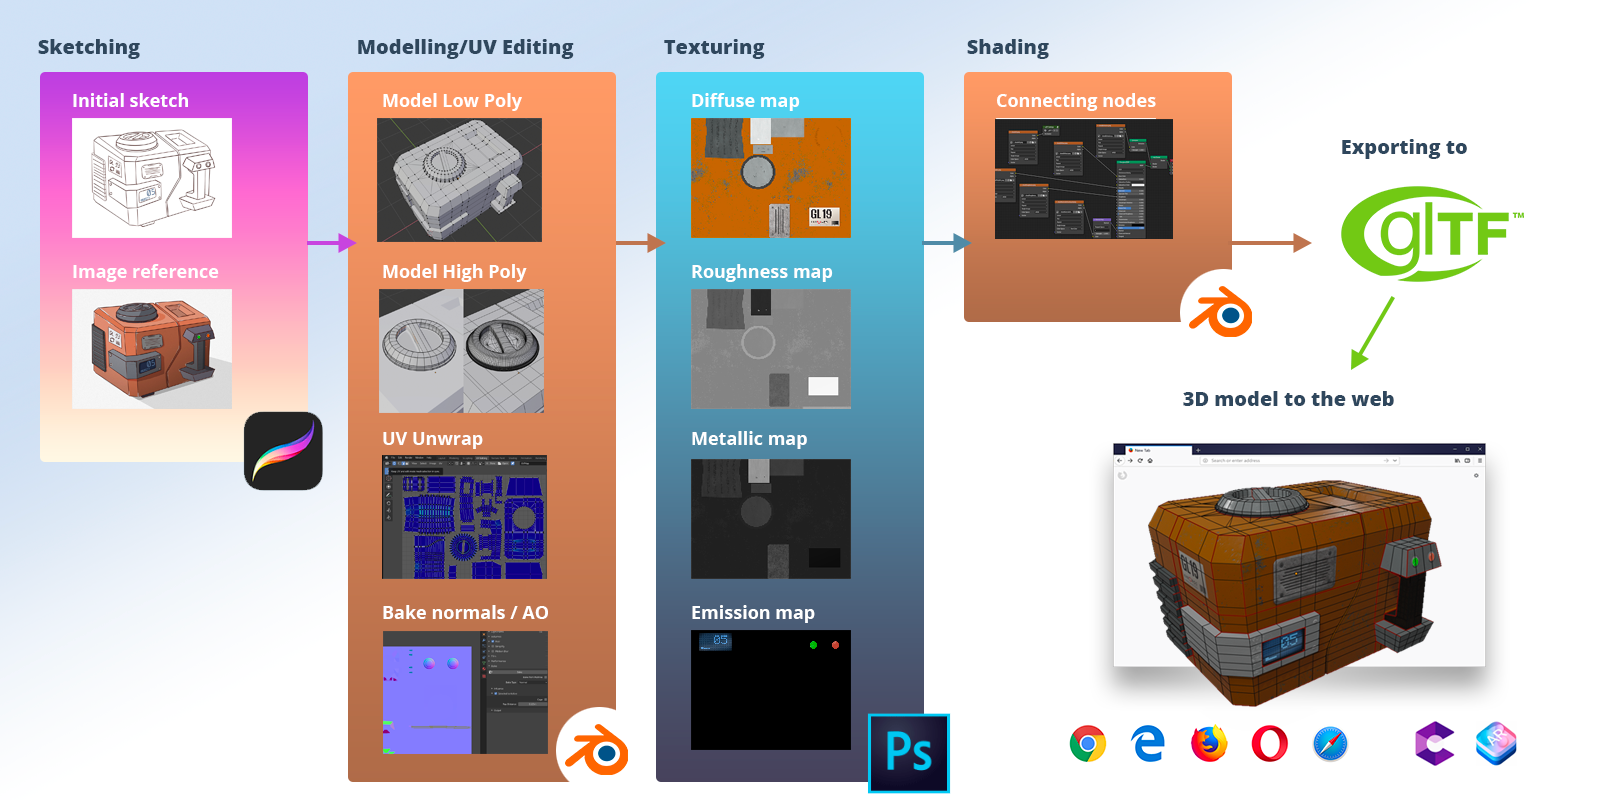 Complete workflow from skratch to final product
The .glb file is 3.8Mb and it contains 4 textures, a JSON and a binary file compressed, these parts you can inspect them on the ‘/glTF’ folder.
I created this 'Futuristic-chest' GitHub repository with MIT licence with all the .blend and .PSD files.
Where to start learning?
A few links and tips to know better what we're going to do next.
Learning from others
- Download and import multiple glTF Sample Models from the Khronos Group repo.
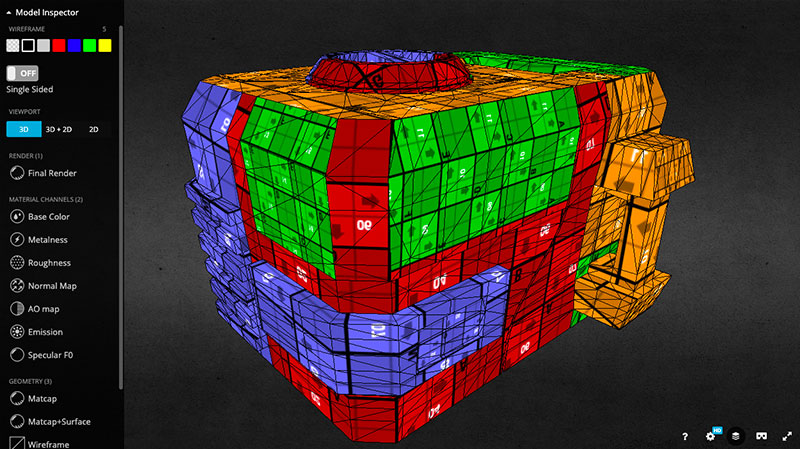
- Use ‘model inspector’ on Sketchfab, there you can view the topology, materials and how the UV were unwrapped..
How the glTF format works
Khronos Group have a great tutorial with examples where we can start to understand how this file format works and what is possible to do with it.
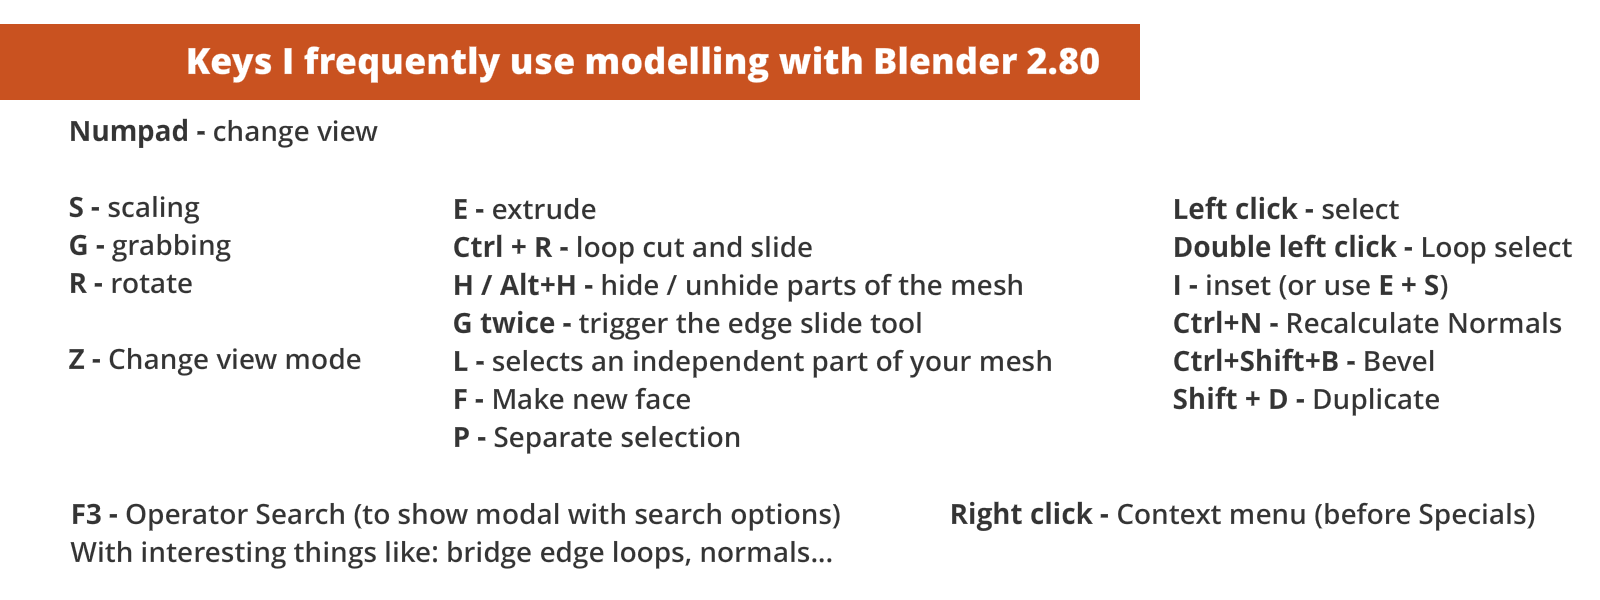
Migrating to Blender 2.80
I strongly recommend to change as soon as possible because the new UI and features make the 3D art process very intuitive. As I recommended on the previous post this is a great intro playlist of Blender Guru about the 2.8 new features.
And these two Blender Guru videos are a MUST to start to understand the procrees we need to make after:
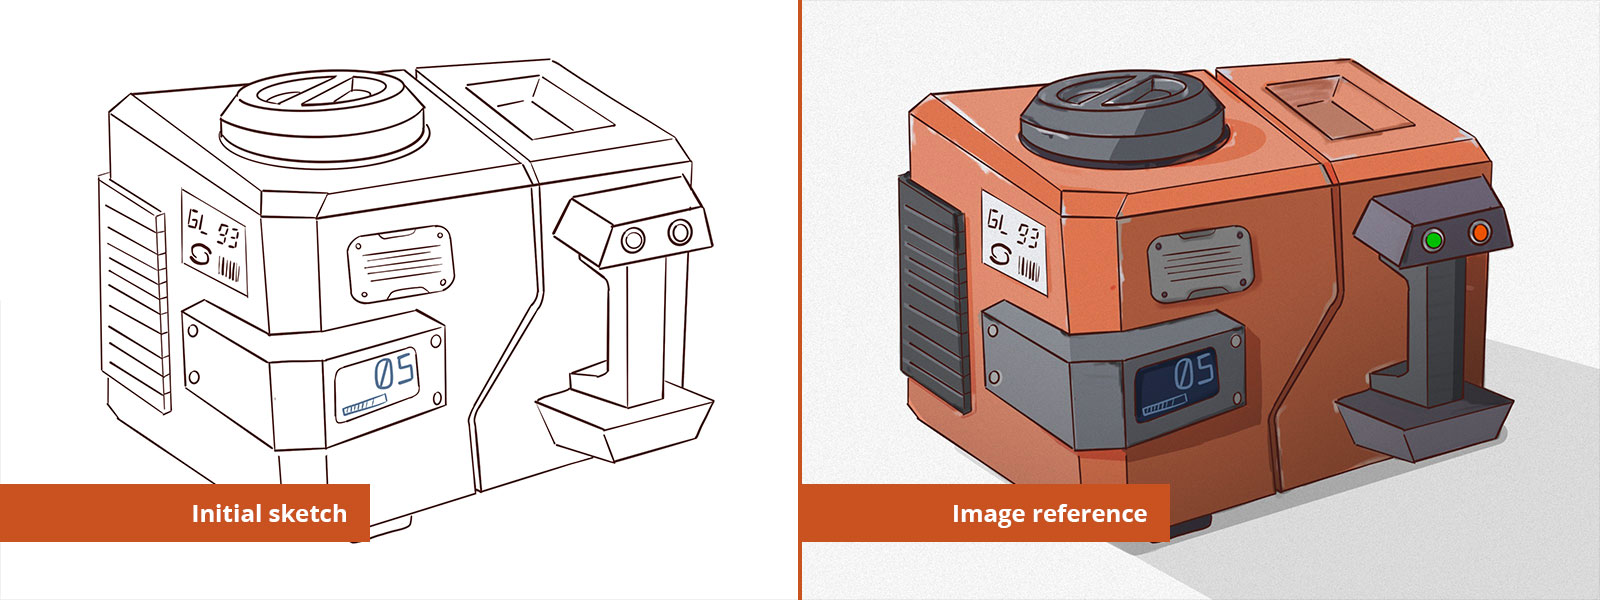
Sketching
After I use paper and pen to make the first sketches, I complete this process using an iPad + Apple Pen. Here a good complete painting process with Procreate, and I have a few customized brushes to make lines and colour (How Technical Pen works video)
At the end I usually have these layers:
- Lines (not 100% black, use blueish, of brownish depending the object)
- Flat color layers (mix desaturated with saturated)
- Gradient smoothly colours
- Highlight glasses
- Shadow layer (dark blue (if you are above a blue sky) with 45% of opacity and ‘overlay’
- Noise Layer - to look made over paper (white layer over all and add noise effect 35%, remove saturation > multiply, opacity 40%)
- Final adjustments with Photoshop
Modelling low poly
It is very important to have a good topology to be able to use Subdivision surface and sculpting when we model the high poly version. The final model has 1347 faces.
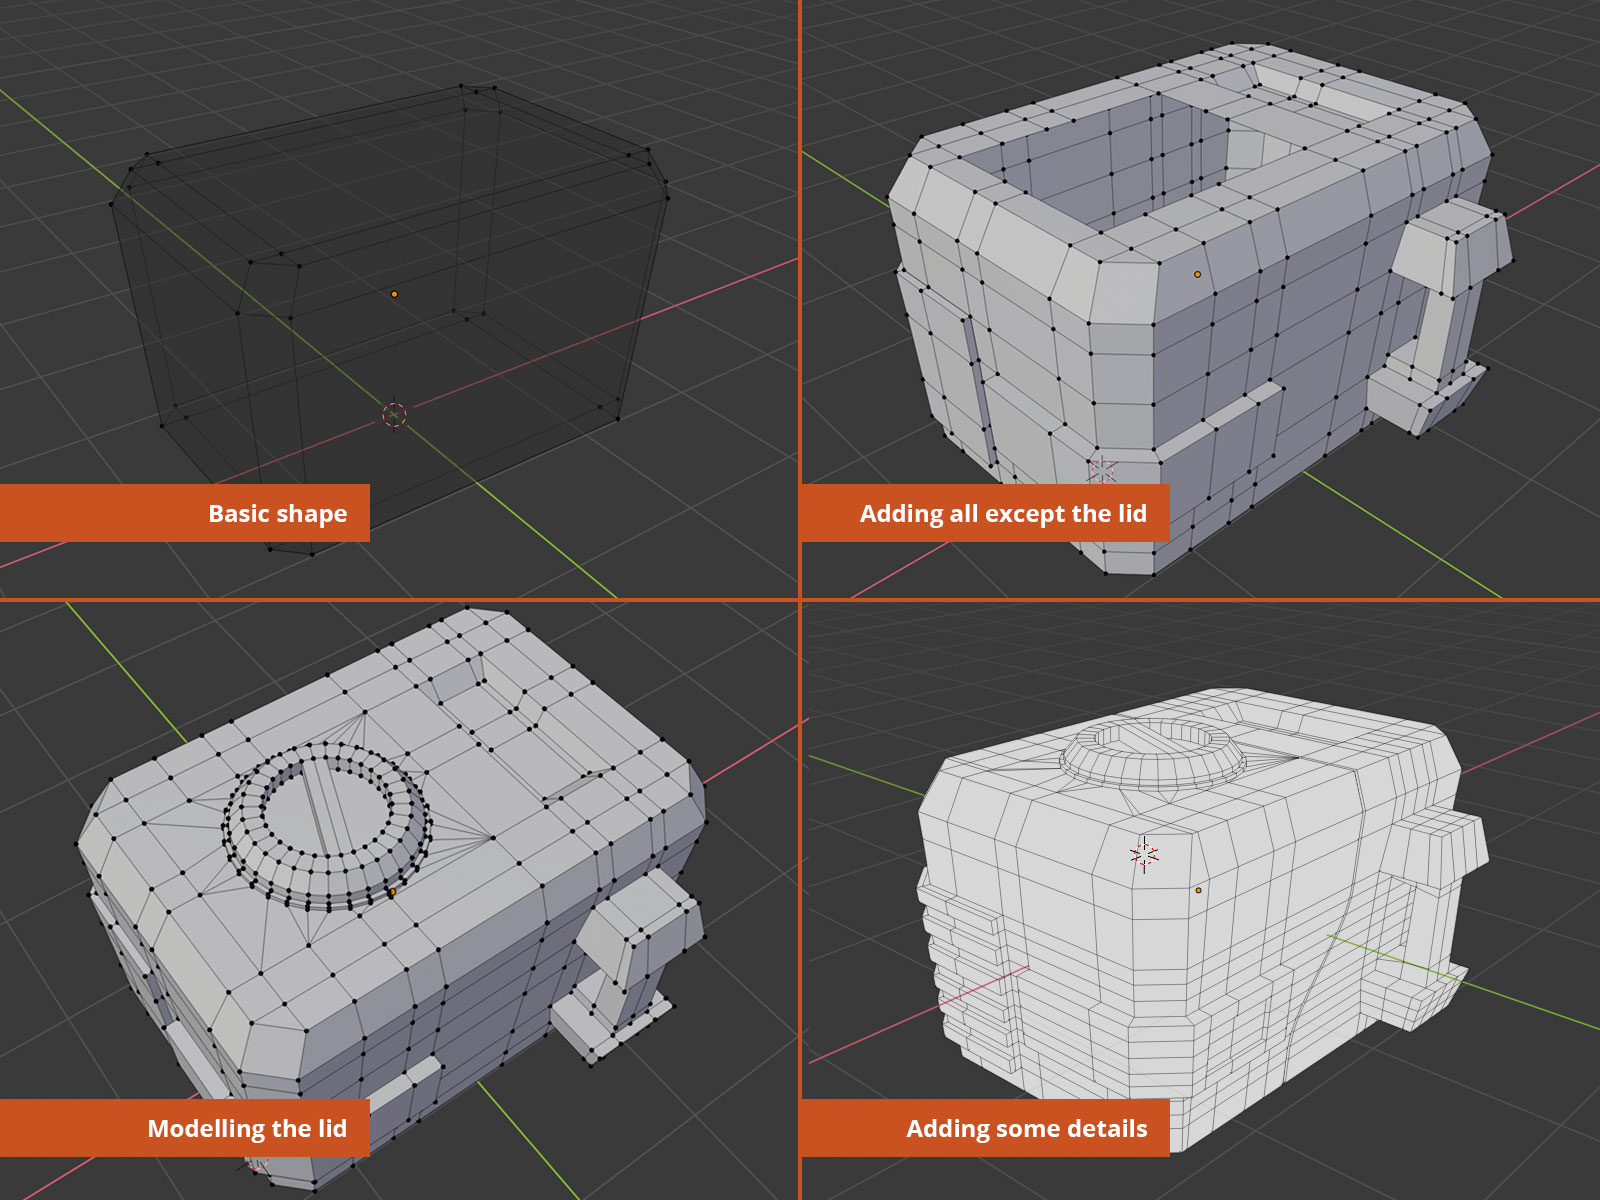
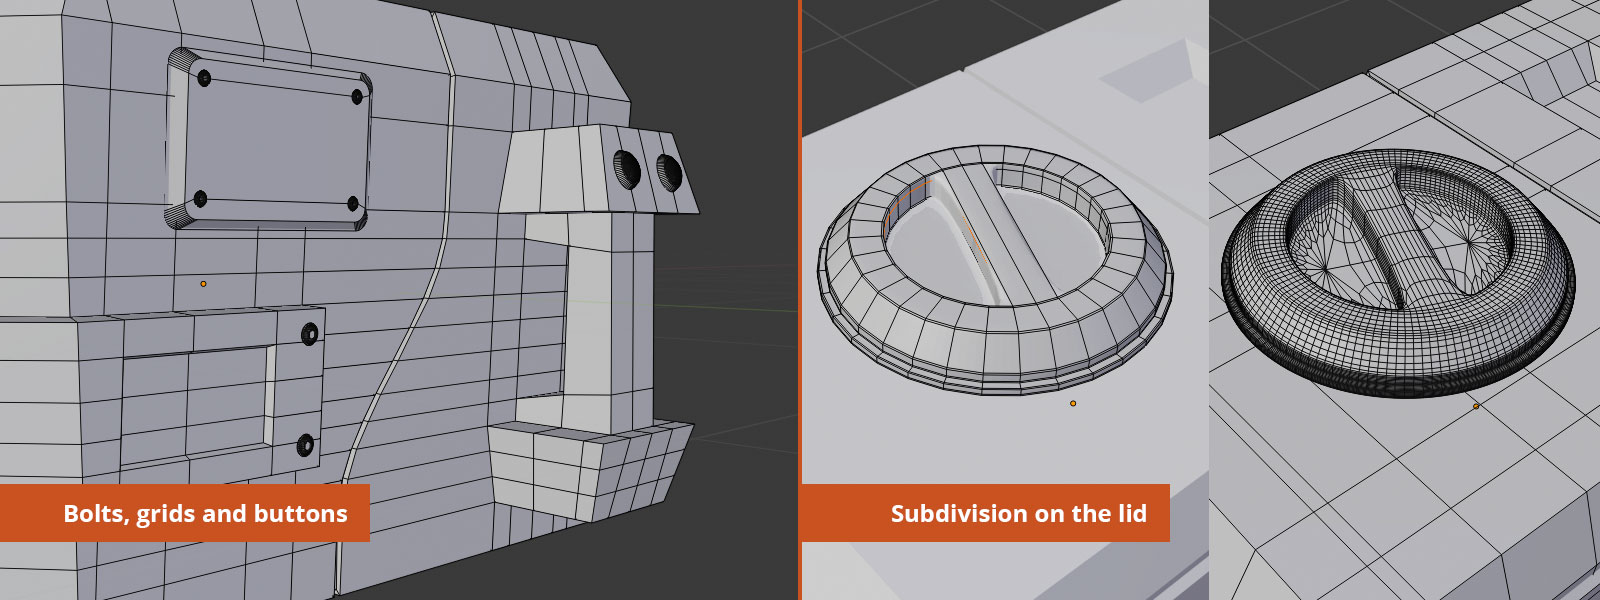
Modelling high poly
On this step I added some details (like blots, grids or buttons) and a few work with ‘Subdivision Surface’ modifier on the lid. The final model has 13866 faces.
A good tip when you are working with Subdivision Surface to use a very reflective matcap to view if the modelling is ok. Here a good video talking about Advanced Subsurf Modeling - Techniques
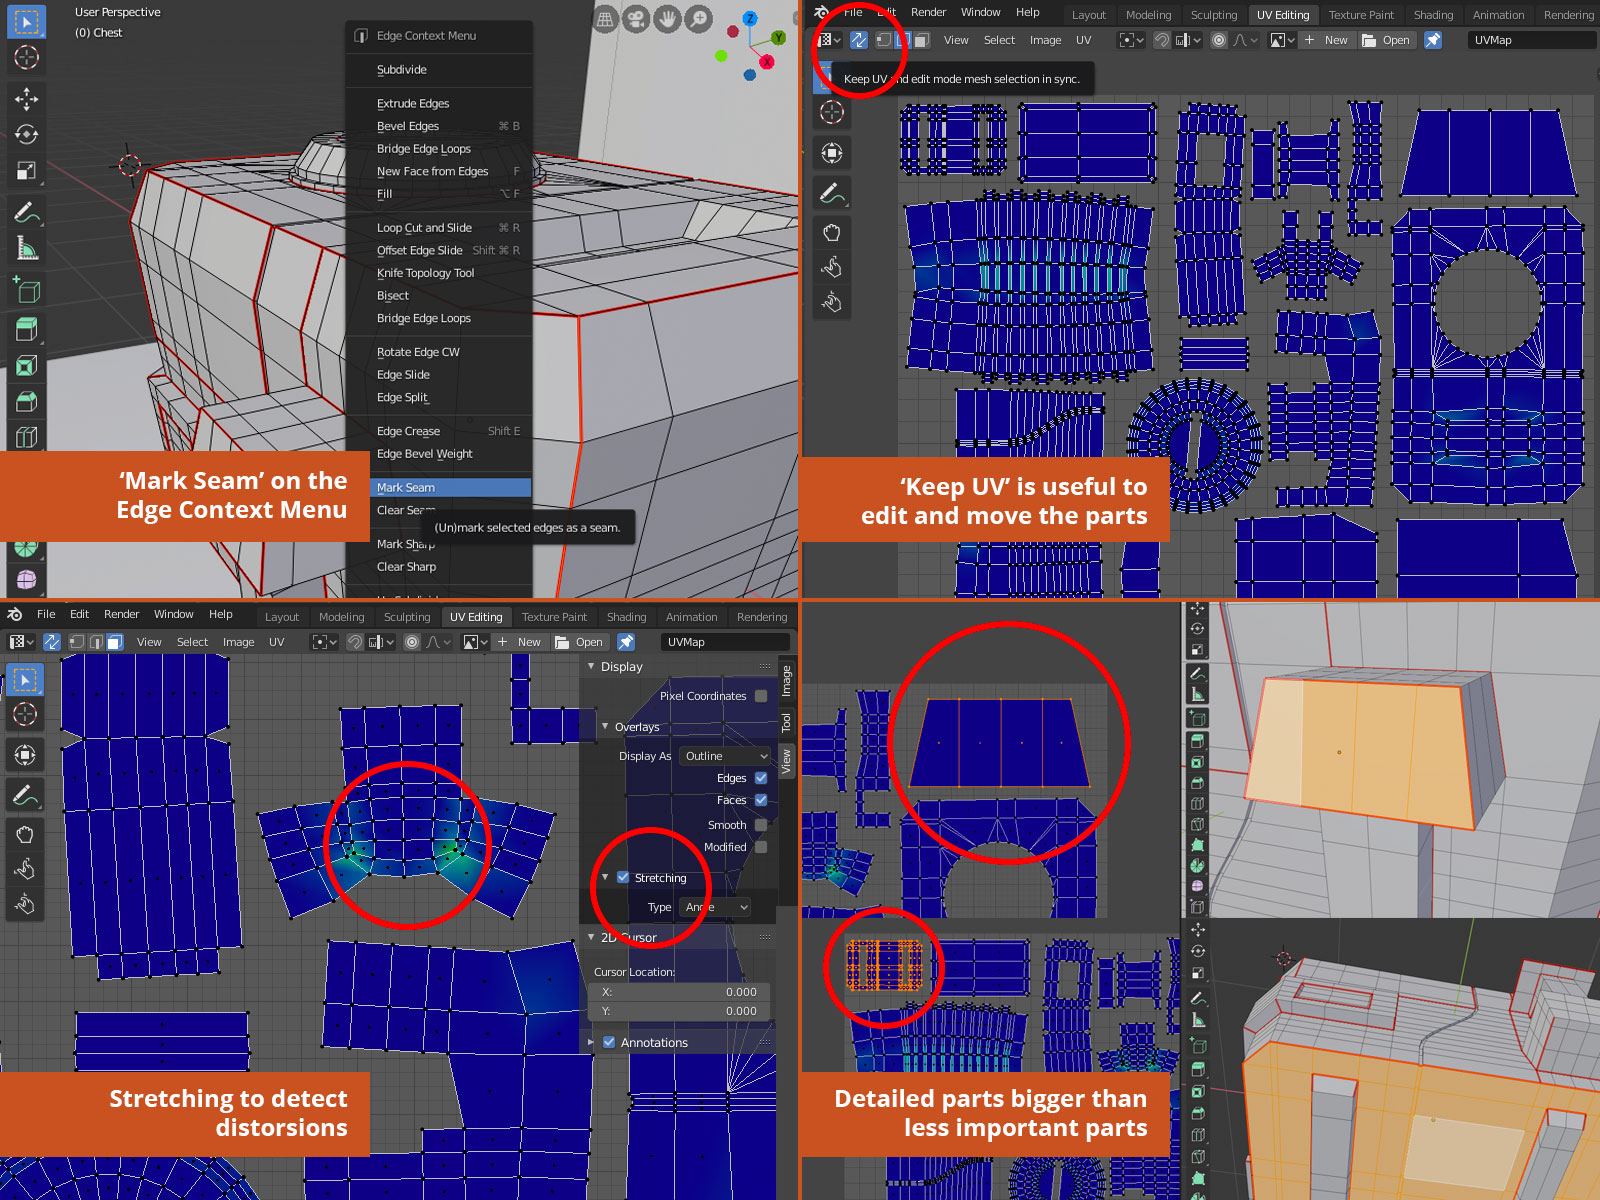
UV Unwrap low poly
Before start to mark seams is important to know what parts will need more and less details on the diffuse texture, in this case the upper part of the handhold and the led screen will have more details and the botton and rear side less.
Two important features are:
- Press ‘keep UV’ button to view the selected mesh on the UV screen.
- Check ’Stretching' to activate stretch heat map to view distortion/stretch on UV unwrapping.
Bake normals and AO
These are the steps to complete it
- Open Shading view and create a new Texture / Image texture and select our created image node (Important set Color Space to Non Color before connect to the material).
- On Modelling view press Alt + G to place low and high poly mesh to the same position clearing their locations. Then select first high poly mesh and then low poly.
- On Render tab select Cycles Render, Bake type ‘normal’ and check ‘Selected to Active’.
- Press ‘Bake’ button.

You can play with the ‘Ray Distance’ parameter until you have a complete bluish image, here are some tips (seen here):
- Check for double vertices (select all and W / remove doubles)
- Check for stray faces inside your model, delete them.
- When you have done this use Ctrl+N again.
- If you have to flip individual faces, select them and use W / flip normal.
- Then bake the normal map again.
Once we have the normal map texture saved, we repeat the same steps before but before pressing ‘bake’ we select ‘Ambient Occlusion’ Bake Type on the render tab and save the AO image too.
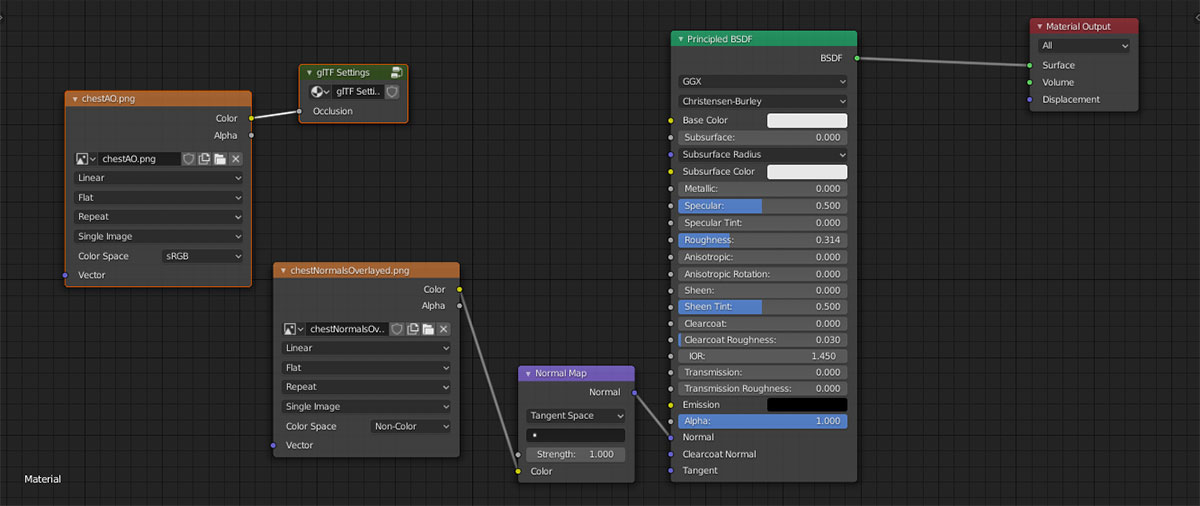
With these two images we can connect normal with de Principled BSDF and the AO using a glTF node to export it as a property of the final file.
A great article with good tips to take in count when you are doing normal maps.
Download .blend file when normals and ambient occlusion was baked
Texturing with Photoshop
Originally I made a 4096x4096 pixels PSD file but to upload to GitHub and reduce the size I commit a version with 1024x1024px.
At the end of this part our goal is to have 5 textures:
- Diffuse map
- Roughness map
- Metallic map
- Emmisive map
- Detailed normals map
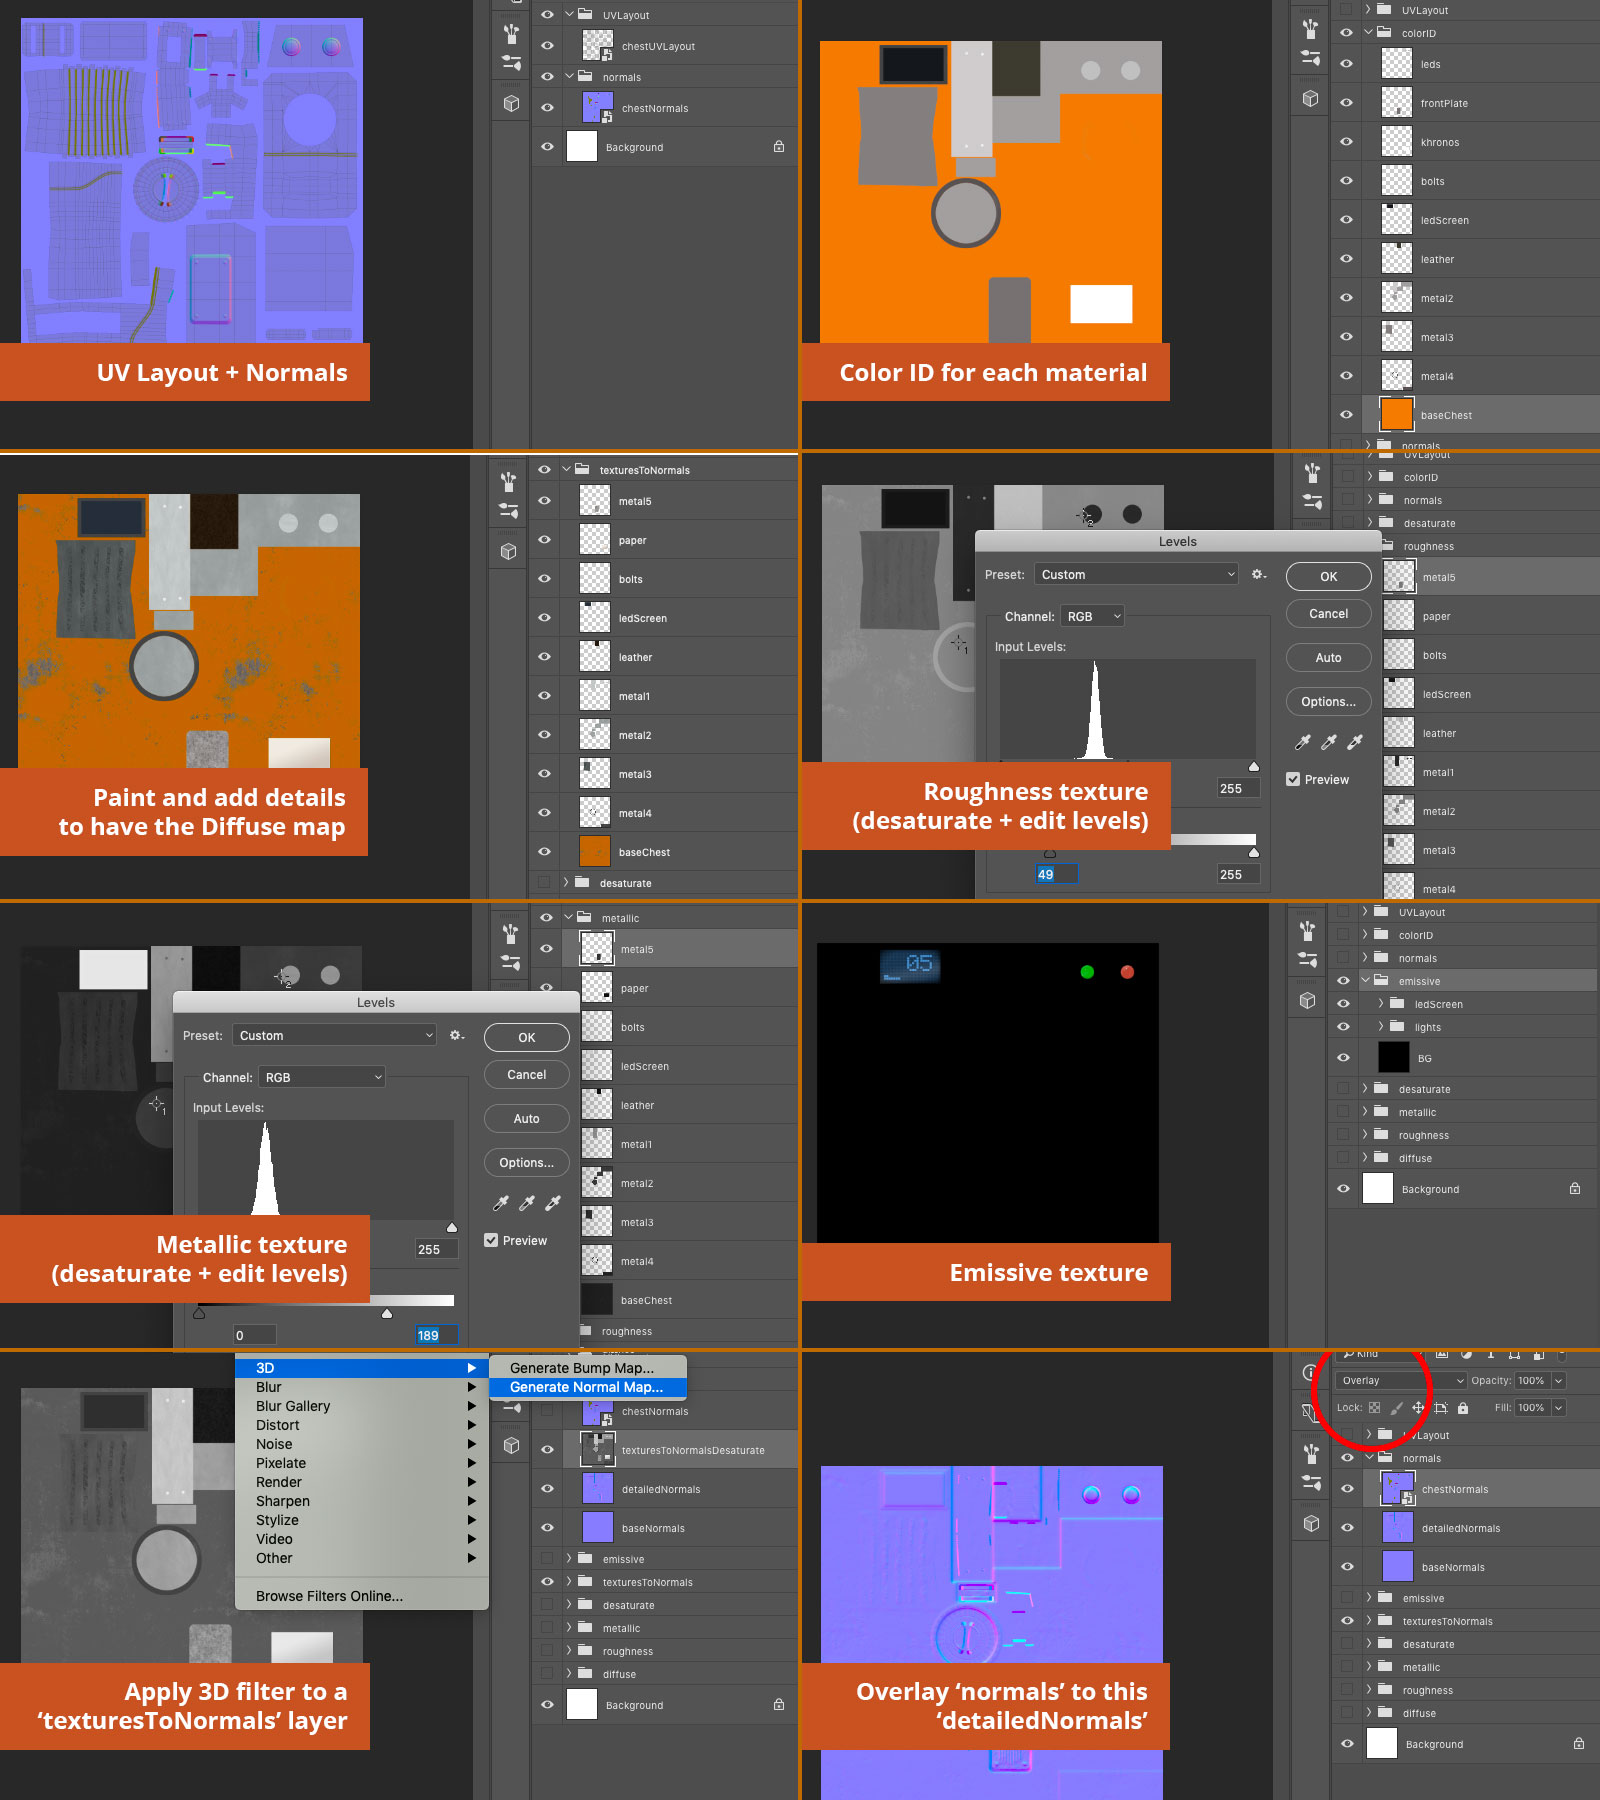
- We export with Blender the UV Layout to use as reference. And the normals map created.
- We assign a color to each material on our model to create a Color ID map, this is possible to do with Blender too, but I prefer here use Photoshop directly.
- Painting, using PRB textures as reference and playing with brushes to create de Diffuse map
- To create the Roughness map, we select each material, desaturate it and play with the Levels to have more Rough (black) or less (white)
- To create the Metallic map, we proceed like we did for Roughness but now white is more metallic and black less.
- To the Emissive texture, we paint the parts that emit light, the rest is black.
- To create a more detailed normal, we use a desaturated version and apply a 3D Filter 'Generate Normal Map'
- The last point is to 'overlay' the exported normals from Blender with this new layer.
Here some free PBR materials to use on your models:
Download .PSD file with all the layers ready to export the textures
Exporting to glTF
Once you have your 6 textures correctly exported (Diffuse, Roughness, Metallic, Emission, Normals and Ambient Occlusion), now is time to play with the nodes in Blender.
First you can connect on the Principled BSDF:
- Your diffuse image texture > Base Color
- Your metallic image texture > Metallic
- Your roughness image texture > Roughness

And to configure the Emission texture, you need:
- Add a ‘Add Shader’ node
- Add a ‘Emission’ node
- Connect you emission image texture > Emission > Add Shader
- Connect BSDF > Shader
- Connect ‘Add Shader’ > Material Output | Surface
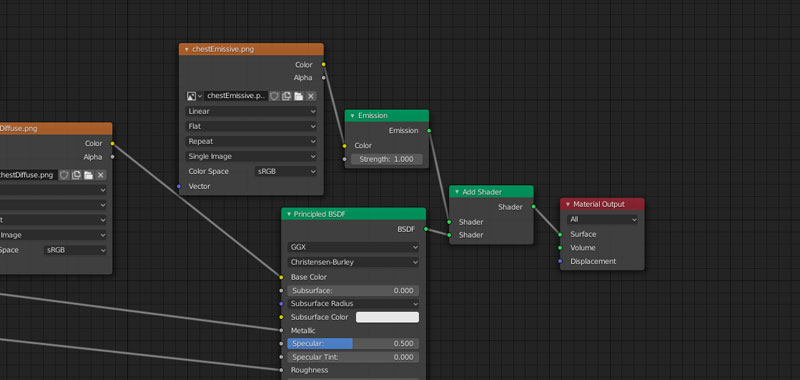
And voila! Now you have your model ready to be exported to glTF as Binary (.glb), Embedded (.gltf) or Separated (.gltf + .bin - textures).
Another alternatives to PBR
As we said PBR is a good option to create a realistic 3D model but it is not the unique option, you can use the glTF extension to have specular/glosiness effect.
If we would need an asset to be part of a VR or 3D scene, we would make a more low poly model and with only 1 texture with the lights baked on the diffuse map, but that could be another workflow post for later.
Usign our model with AR
The easiest way to use it is having two versions of our model:
- glTF: We just createdand is complatible with Android + ARCore
- USDZ: With Maya+pluging or with Blender + converting from our glTF with the usdz Tools that you can download here.

 Why you should start to create 3D content for the web
 Applying Progressive Enhancement on a WebVR project
 Making a WebVR experience for the HTC Vive